

I dunno why I made a parol this year. Maybe I just miss spending the holidays in the Philippines so much.
A 'Parol' is a lantern made specially for the yuletide season in the Philippines. It is most commonly formed in the shape of a star or pentacle, although it can also be in the form of flowers or bells. It may or may not have lights. Common materials used to make a traditional Parol are bamboo, papel-de-hapon, plastic wrap, tinsel, or from recycled materials like newspapers, drinking straws, ect. They are always related to the star of Betlehem, although I am not quite so sure about that ('cuz pentagrams to me have a deeper pagan meaning)...
Since I was making a Parol two weeks ago, I decided to take photos and make instructions on how to make a "recycled parol"...my way...Maybe my way can be your way too, or you can use this as a guide to make your own version of a parol...

regular glue
super glue
transparent tape
packing tape
a cutter / Xacto knife
regular scissors
bandage scissors (it's a nurse thing)
a permanent marker
an oven thermometer
some twine
gift tissue wrap (to substitute papel-de-hapon)
35ct cheap LED multicolor lights
cardboard from shipping boxes
5 empty and clean soda cans
a straight edge / ruler

I grouped the strips into 3...that makes 10 groups...
Glue together 3 strips to make a stack, and you'll get thick cardboard that can act as a sturdy material for making your star's frame.
When done there should be 10 thick strips of cardboard. Divide the 10 strips into 2 groups of 5.
Now, to make the frame...
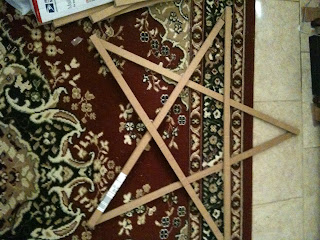
Take the first five strips of cardboard..
Align your cardboard like so to make a star...
I glued the ends and joints together, and as a precaution I also taped it with packing tape, but you can also tie the joints and ends with twine.
Repeat with the other 5...

Now I have 2 pairs of stars...

To make the 3-d star, first I lined up the cans like in the picture, then the initial plan was to glue the aluminum cans to the cardboard, but neither superglue nor elmer's glue worked...so I had to think of a different way to secure the ties...
this is where the oven thermometer comes in...lol
I used the thermometer to punch holes at the center of the cans, and at the center of the stars' joints..LOL

just like so....

u can use scrap cardboard to help hold the twine will you work
on the other cans...

once the cans are in place on one side of the star, start working on threading the twine through the holes on the other side of the star...it helps if you put tape on the twine to help keep it together and it also stiffens them up, acting like a needle...

so, I tied them up good, then I tied the ends of the star and now I have a 3-d frame...

now just cover it up with your choice of paper or cellophane wrap...I used some thin gift tissue paper because I also placed the 35 led lights inside my Parol...Lights are optional...
Now I just added tails and then hang your star outside!!!
